
Equipment for Making Track Videos
 This page describes the kinds of equipment that are available to people who want to capture in-car video at the track. Actually, it mostly describes what I have used or am currently using, but that's still a good starting point for a discussion on what to consider then setting up your own system.
Contents
- Camcorders
- Bullet Cams
- Digital Video Recorders
- Camera Mounts
- Audio
- LANC and Remotes
- Pre-wiring the Car
- Electrical Power
- Accessories
- Editing Software
- Editing Hardware
- Custom Hardware
Cost Range: $400 to $1300
Sources: B&H Photo, local consumer electronics stores
I'm currently using two different camcorders. One is a standard-definition Sony DCR-TRV80 which I have been using for years, and the other is a Sony HDR-HC9 high-definition camcorder which I have been using for about a year. I've written reviews on both of them (You can find them in the reviews section.) so I won't go into the details of these cameras here, but it is worth noting a few things about them.
Both of these camcorders record to DV tape. I prefer tape for my projects because tapes are cheap and unlike hard drive or memory media camcorders, I don't have to dump all of the video onto my computer in order to keep it. I can just digitize the parts I need and then store the tapes. Also, I wanted to stay away from cameras that compress the video as quality usually suffers and often, especially for the smaller and cheaper cameras, the compression CODEC used can make it nearly impossible to edit the video. Not "edit-friendly" is the term often used. Finally, I have only experienced maybe three tape glitches over the past 6 years. Not bad. Some people have told me that the idea of using tape in a race car bothered them, but then I have had friends who were using solid state cameras and when vibrations were too severe their cameras shut off. No more video for that session! When I get a glitch in tape, I can just edit it out.
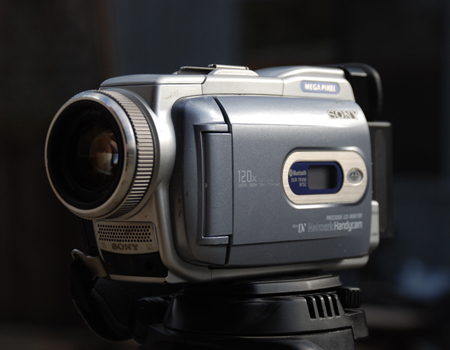
Sony DCR-TRV80
The optics and image quality from both cameras is excellent. As far as I can tell they are as good as anything you'd see on TV, for well-lit scenes anyway. Both cameras have excellent optical zooms but I don't use them for in-car video. I do use a UV filter to protect the lenses and sometimes I use a polarizer to reduce glare. All those bright and shiny cars, you know.
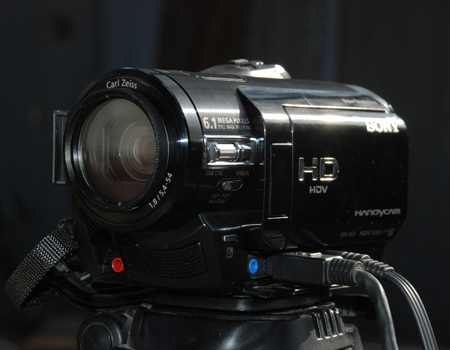
Sony HDR-HC9
The high-def videos recorded by the HDR-HC9 are wonderful and the Blu-ray videos I have produced really wowed my viewers. This makes it very difficult for me to continue using the SD camera, but, as I may be getting involved in some broadcast video projects soon, and SD (NTSC, 720x480) is still widely used, my SD camera will be useful to me for some time to come.
One thing about the SD camera that is very nice is that its A/V port is bi-directional. It can output to a TV or VCR, and it can accept audio and video from a VCR or external cameras and audio sources, basically becoming a VCR. I have used this feature often when I use a bullet cam to get the video from out side of the car, such as on top, looking back, on the door, etc. (The HDR-HC9's A/V port is output-only.) Another nice thing about this camcorder is that it gives me full-frame (720x480) images, perfect for DVD and digital TV. Many camcorders give you 640x480, which is OK for replay on the computer.
Don't forget that you'll need a few accessories with your video camera. Extra batteries and stuff like that for sure, but make sure you get something to protect your lens, especially if you ever want to put the camera out in the wind. A polarizer and/or UV filter should do. These can help improve image quality and the polarizer can be a lot of glare out on the track that you probably won't notice while driving but you will definitely notice it when viewing the video when you get home. The first track videos I made had this problem.
Among all of the features of modern camcorders, these should be high priorities for your track video system:
- Video Format - start with this. What kind of video do you want to shoot? High-def (720p, 1080i and above)? Standard definition for replay on the computer (640x480)? Full-frame standard def (740x480) for replay on TV?
- Storage Medium - DV tape, compact flash, hard drive, DVD? If you decide on compact flash, find out what the highest capacity flash memory device it can handle is and what the minimum transfer speed should be. For both hard drive and compact flash systems, check on the maximum continuous recording time. Some cameras and DVRs will stop recording after the file reaches 4 GB, the limit of the FAT32 file system. Others keep recording but you need to use software that comes with the camera or DVR to stitch the 4 GB clips together again. In both cases, make sure the recording time is at least as long as your track session or however long you need to shoot video before you can change media or download everything onto your computer.
- File Format - Try to avoid cameras that store the videos in a highly compressed format, such as MPEG4, and possibly even Quicktime (MOV) files. These formats can be difficult to edit. For a point of reference, DVD-quality is an MPEG2 file with a bit rate of 5 Mbps.
- A/V Port - Do you plan to use a bullet cam? If so, the A/V port will need to accept A/V inputs. The A/V ports on many camcorders are output-only.
- Media Loading - How do you change the tape or memory card? Do you have to remove the camera from the tripod or camera mount in order to do this? My SD camera loads tapes from the bottom, so I do have to dismount it. My HD camera loads tapes from the top and I don't. That's means a lot to me when I only have 20-30 seconds to reach into the car and change tapes during a pit stop.
- Battery Life - Can you get through the day on the battery that comes with the camera? If not, can you easily swap in another battery? Can you run the camera off the car's 12v power?
Back to top
Price Range: $150 to $300
Sources: JonesCAM,
ChaseCAM,
IOPort Racing,
DataToys,
RacerPartsWholesale,
VHoldR
I currently have two bullet cams, one which is mounted in my car's grill, where it is secure, aligned, and has a dust cap to protect it when I am not using it. The other is free to be installed anywhere.
Both of my bullet cams are the slightly older 480-line types and I don't recommend buying one unless you can get them real cheap and aren't really looking for the best image quality. They do a pretty good job, but 560 and 580-line cameras are available now. Other than that, they have been very useful and fun. I've mounted them on my door looking past my front tires to show how close I get to cones during autox runs or to the burm at the track, and on the roof looking down the hood, looking back at cars I just passed ;), in the car looking at the driver, and even under the steering column to record all of the fancy footwork that road racers need to know how to do.

The bullet cam is almost hidden in the grill.
These cameras can be powered from the car's electrical system or from batteries. My cameras will run all day, I think, on a pack of 8 AA batteries (8 x 1.5 volts/battery = 12 volts). When powering them from the car's electrical system check to make sure you aren't getting ignition system noise in your video. If you do, a simple power line filter, available at most electronic supply stores for around $8, should solve the problem.
Bullet cams come with wide angle lenses, typically 3.6 mm, for a field of view of 88°, wider than most video and still cameras, but sill somewhat less than the human field of view, which is 120 x 180°. With such a wide field of view you get to see a lot of the track, and it makes the action look faster than a conventional lens does. That can be nice. Mount the camera low in the front of your car and it will really look like you are flying around the track. Of course, this effect also makes the cars that pass you look like they are traveling twice your speed, and the car you are following closer than you ever would on the streets looks much farther away that it really is. And it looks smaller than what you were seeing. Finally, wide angle lenses are known for producing a fish-eye effect where objects at the edge of the field of view look like they are bending towards your car. Such are the trade-offs one has to make. But, these lenses can easily be changed, and they are not expensive, somewhere in the $20-$30 range. You can get lenses from ultra-wide-angle 2.5 mm (120°) though zooms of 16 mm (20°).
At this time all bullet cams are standard definition, 720 x 480 for NTSC cameras. All but one. The ContourHD1080 is a small, self-contained high-def bullet cam that runs off an internal rechargeable battery and stores the video on an on-board MicroSD card. It captures video at 30 and 60 fps video rates, includes a small microphone, and provides lasers to help aim the camera. (There is no viewfinder.) The controls are simple and easy to use, and the price is pretty good. You can get a complete camera system for just under $300.
One feature that seems to be rare on bullet cams is a way to turn off automatic gain control (auto brightness) and auto white balance. When I go from a brightly lit part of the track to a more dimly lit one I'd like that to be shown correctly in the video. Also, if a red car starts to fill the field of view of the camera, for example, I don't want the camera to cut back on red to try to keep everything balanced as if scene still contained all the usual colors. JonesCAM does have one camera that has OSD controls on it that let you change these and other settings.
Back to top
Price Range: $500 to $1200
Sources: JonesCAM,
ChaseCAM,
DataToys
For years I've been using camcorders to record my video and audio, but I am now seriously thinking of getting a digital video recorder. These would take over the recording functions of my cameras and they even offer a number of the advanced features you'd expect to have on a video camera, such as control over white balance and similar settings, mic and line-level audio inputs, and LANC control. You can also find unique features such as the ability to power your bullet cam, a serial port interface, even the ability to turn themselves off and on and start stop recording when the car starts/stops moving. In addition, they are smaller than the typical video camera and are clearly more rugged, plus some are even water-proof. But, they have the one disadvantage that led me to using DV tape in the first place, and that is the videos are stored on solid state media or hard drives. This means I'll have to download everything I want to keep onto my computer, or else just delete it, before I can use that media again. The price of these media are dropping, but they are still no where near the $2-$3 I pay for DV tape so I can't afford to just label them and put them in a box. But back in favor of these solid state devices again is another great advantage, and that is the ability to record high-quality video for 3 or more hours, depending on the video quality you selected and the capacity of the media.
There are a number of motorsports DRVs on the market and the prices are in the ball park of a decent video camera. When considering these I am sketching out my system and how I want to use it, including the number and types of mics, and how I plan to use them. In the present case I want to be able to record 8 hours of uninterrupted video, with good sound, and some of that sound involves tapping into the driver's radio, if that is possible. To do get the audio I'll need at least two mics, possibly ones that operate at line level. For the video I'll need the stated 8 hour recording capacity.
To get the 8 hour recording capacity I need, at DVD-quality data rates (5 Mbps MPEG2), I'll use up 8 GB in a little over 3 hours, so I'll need a 32 GB compact flash card. But note that these cards are formatted as FAT32, the Microsoft file system that followed the original FAT file system used by DOS, but before NTFS was introduced. The FAT32 file system limits file sizes to 4 GB. In one unit I am looking at you can record past this limit. What the DVR does is stop recording to the files when it reaches this limit, then starts another file and just keeps recording. When you download the video to your computer you use the supplied software to stitch them back together again.

The Datatoys XM-DVR can record two audio and video streams at the same time.
So, evaluating a DVR is similar to evaluating a video camera as far as the recording specifications go, and so many of the points noted above in the camcorder section will apply here as well. But with the unique features they offer, there is still a little more to think about.
Back to top
Price Range: $10 to $120
Sources:
ChaseCAM,
IOPort Racing,
StickyPod,
RacerPartsWholesale
For the in-car shots I use the camcorder alone and it is mounted on my harness bar using an IOPort CM1-2 camera mount. This mount works great and I highly recommend them, for people who have roll cages or harness bars in their cars.

IOPort's CM1-2 camera mount
For people who do not have a harness bar or cage in their car there are still many options. If you are inclined to take the homemade contraption route you can make a cheap bracket using 1-inch aluminum channel, cut into three pieces, and screwed together. One piece will go across the rear deck, where it is secured to the car, and the second piece attached to it at 90 degrees, allowing the camera to be mounted closer to the front of the car. One other piece of channel is required to support the camera and it goes down to the floor and attaches at a seat mounting point. Or, you might also be able to simply mount a tripod in the car. The lengths of the legs are adjustable and all you need to do is adjust them then strap it down somehow.

The Hama camera mount lets you mount a camera on the windshield,
on body panels, any smooth surface. (Photo by GotBlueMilk)
More convenient options include getting those camera mounts that attach to your seats. If your seats don't move much those should work fine. There are also a number of clamps and suction cup mounts you can use both inside and outside of the car. StickyPod makes suction-cup type mounts that can handle some pretty big cameras.
Whichever option you go for make sure it is safe and sturdy, that you also use a safety tether in case it gets loose anyway, and make sure your track marshall approves of your installation.
If you are getting your video from bullet cams and are just using the camcorder as a VCR, and you don't have a passenger, and you do have a passenger seat, you can usually get away with just strapping the camcorder in your passenger seat using the seat belts. You might also want to use tape or a rubber band to make sure the A/V cable does not come out as the camcorder rolls around, hopefully not much, in the seat.
Back to top
Price Range: $25 to $300
Sources: B&H Photo,
ChaseCAM,
DataToys,
Core Sound,
Audio-Technica,
local audio/stereo shops and music stores
Your camcorder most likely has a built-in microphone. It might even be a stereo microphone. Unfortunately, you probably won't be able to use it. Wind noise, including the wind blowing into the cabin, will drown out all sound once you get up to 25-35 mph. If you are driving a convertible, things are much worse.
Audio is important in video, and in track videos in particular, so you need a solution. The solution is to use external microphones and to mount them out of the wind, and out of the wind includes out of the passenger cabin, unless you are allowed to run with your windows up. The two preferred places are under the hood and on the back of the car.
For track videos the microphones do not have to be high-quality (and expensive) units. It's not like you are trying to capture the sound of a hummingbird or anything delicate like that. This is a very noisy environment. Rather, what you want, if you can get them, are microphones that can handle the higher sound levels. If you can't find mics like these you'll be OK, you'll just get some distortion in your audio, mixed in with all the other noise.
Another thing to watch for is that the mic input port on your camcorder is expecting a very low voltage signal. The camcorder uses its own internal mic preamp to boost that signal. Most common mics will work fine with this. But, if you want to record audio through your camera's A/V port, which is what you will need to do if you are using a bullet cam or some other video source, then you either need to supply the preamp yourself, or you just need to get mics that output line-level signals.
I have been using a set of inexpensive lapel mics and they have been working great, although I do get the clipping noted above. I have one set for mic-in situations when I am getting video from the camcorder and a set that outputs at line-level for my bullet cam projects. I also made a small pre-amp using a Forest Mims circuit I found in a hobby electronics book so I can still use the mic-level mics in these applications.
You could use a standard mic, but you may loose out on the nice stereo effect. But, under the hood the stereo possibilities don't have much to offer so these will work well there.

Lapel mics are mounted near each of my tail lights. (Photo by GotBlueMilk)
Back to top
Price Range: $65 to $250
Sources:
ChaseCAM,
Sony, some camera stores
LANC provides a way to control your camcorder remotely, by wire. Your camera might have this feature. Look for a blue phone jack, or, on some newer cameras, the LANC connector might be a mini-DIN or other type. With LANC it is possible to turn the camera off and on, start and stop recording, and depending on the LANC controller you are using, focus, zoom, and change many other settings. LANC controllers can be as simple as a single push button, to those that handle many of the camera's basic functions (Sony RM1BP), to pretty much all of the cameras functions (Sony RM1000BP). Prices vary accordingly, from around $50 to over $1000 for the RM1000BP.
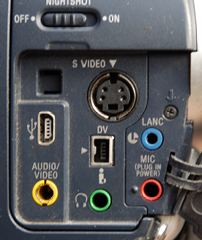
I/O Ports on the Sony DCR-TRV80
LANC can be very useful when shooting track video. Instead of taking your gloves off and fumbling around to find your camera's off/on switch, then put it in VCR mode (necessary if you are using a bullet cam), then start recording, you just press a conveniently located button and check the status LED to make sure it is recording. I've used a single-button type LANC connector with my SD camcorder for years whenever I'm using a bullet cam as my video source. I press the button once and the camera turns on and switches to VCR mode, press again to start recording, then again to stop recording, then finally press and hold to turn the camera off. There is a single LED on the switch that lights red or green to indicate what the camera is doing. It has been great. I just plug it into the blue phone jack on the camera, tape the button to my center console where I can easily see it, and that's it. It's simple, it doesn't do much, but that's just what you need when you need to concentrate on your driving.

The LANC controller and IR remote I use with my SD camcorder
My HD camera has a similar LANC port, plus one of Sony's multi-line LANC ports, but it does not operate as a VCR so LANC, like bullets cams, are not an option for this camera.
Your camera's IR remote can also be useful. You still have to turn the camera off and on via the switch on the camera, but you can use the remote to start and stop recording, zoom, even shoot stills.
Back to top
One thing I have done that really helps at the track was to pre-wire the car to provide power for the bullet cameras and audio and video lines to bring everything into the car near where I mount my camcorder. That way I can quickly hook up a bullet cam just about anywhere on the car without messing with wiring. Not only is this quick, but it is also safe and reliable.
A/V and power jacks located in the trunk of my car.
Back to top
Price Range: $8 - $12 for a power line filter (Philmore), $5 - $10 for parts needed to make a simple battery pack, $95 for a power isolation module
Suppliers: Local electronics parts stores for the line filters,
ChaseCAM for power isolation.
A car's electrical system can cause a number of problems for a video system. Equipment designed for automotive uses may be able to run under a wide voltage ranges but it may still be a good idea to provide voltage regulation. The lifetime of some of the cheaper LCD monitors, for example, reportedly suffer when used in an unregulated system. ChaseCam makes a power isolation module that looks like it could do the job, but it doesn't seem to be a voltage regulator, just a filter. (I've never used one.)
Cameras and other equipment may be sensitive to ignition noise. That was true of my first bullet cam. This problem is easy to solve using the radio/CB choke/capacitor filters that are available at most electronic supply stores.
You may be able to run low-power devices using batteries. Look around and you'll find many options, and it is very easy to slip some standard alkaline batteries into a cheap plastic battery pack and solder a cable to it.
Back to top
Price Range: $625 - $799 for a dual camera video processor
Suppliers:
ChaseCAM, DataToys
If you have two bullet cams then a split-screen accessory might be fun to try out. I've used one to make videos where one camera is looking forward, and the other at the driver, or at my feet, or back at the cars I just passed or that are closing in on me. Units are available for two and more cameras and usually include options for where you want each view to appear in the video, how big each one is, etc. The ChaseCam unit I has used includes a timer and the video from one camera can be flipped horizontally, a nice feature to have for those times when one camera is pointing out the back of the car. I've also seen people using units they purchased at consumer electronics stores, the kind used in security systems. They seemed to work well although they were rather large and not exactly rugged.
Other accessories to have on hand are a selection of cables, cable adapters, cable ties, and other odd bits.
Back to top
For editing I'm using Adobe Premiere Pro. It's pretty pricey, but if you are a student or a teacher you might be able to get an educator's discount, which makes it merely expensive. Anyway, for the longest time I didn't really explore its more advanced features but now that I have I'm much happier with it and I've started trying to do more things in the videos. I cam mix and blend video clips, add graphics and titles, and even track maps. The Ken Burns-type effect (panning and zooming) is easy to do, as is blurring out faces or license plates, and the audio editing features have come in handy.
There are less expensive options for editing software, but I haven't used any of them, other than AVS4You, so I can't comment, and there's not much to say about the AVS4You editing software. But here's one thing to consider when purchasing your software - that world is divided into linear editing, and non-linear editing (NLE). The analogy for the non-linear option (Premiere is a non-linear editing program) is something like word processor software where you can cut and paste text, and tables, and pictures, and all sorts of stuff, pretty much any way you want, while for linear-editing software you are limited to patching paragraphs one after another, end to end, in a line, linear, usually with some options on how you want to stick them together, i.e. the transitions (fades, wipes, etc.), and titles, but that's about it. Not that that is bad. These programs are easy to use and many online videos were probably produced using these programs.
If you will be making track videos that include the data from your GTech Pro, using BS4TV of course, you'll definitely need NLE software, and more, that software must support chroma-keying (blue and green screening).
Back to top
Storage and CPU are the high-priority issues here. Obviously you'll want the fastest CPU you can afford, to a point. But it definitely does make a difference. My laptop, for example, could render a video three times faster than my desktop computer, so I bought another desktop machine. But 3X faster means a lot when it might take 90 minutes on one machine to export a video. Cutting that to 30 minutes, saving me an hour, is pretty nice.
As for storage, my editing computer currently has 2 TB of RAID 1 disk storage, another 2 TB of non-RAID that I use for backup and other off-line storage, and another terabyte of USB drives for whatever. Oh, and I'm running out of disk space. (I've been doing this video thing for a few years now.) The storage requirements for a typical 20-minute track day session is about 4 GB for the imported SD video plus 1 to 4 GB for whatever is exported. A 15 minute autocross video project I did, by comparison, consumed 14.7 GB of space, while another project, the 2006 25 Hours video, used 38.5 GB of hard drive space. The more recent 24 Hours of Lemons video (Thunderhill, 2009) which was a 2-day event and was shot in high-def, ate up 120 GB! I'm looking forward to the time when the costs of 50 GB Blue-Ray media comes down. At least then I'll be able to get these projects off of my hard drives.
The third part of the hardware issue is hard drive through-put. This tends to be the bottleneck, thus the earlier "to a point" caveat on fast CPUs. The recommended setup for serious video editors is a bunch of RAID 4 (speed) SATA or SCSI drives where the operating system is on one physical drive (RAID cluster), the swap file on another, the source video files on yet another, and the exported video going to yet a fourth physical RAID drive (physical drive, not a partition on the same drive). But, who can afford that?
Back to top
I won't going into any detail on this here, but will just point out that it is pretty easy to find the parts you need to build your own video support hardware. The figure below shows one that I made and am currently using. It includes a power line filter, a stereo mic preamp, audio volume control, inputs for line-level and standard mics, inputs for two cameras, video and audio output, and a picture-in-picture board that I took out of my old ChaseCam unit. It also provides reliable and convenient power outputs to run the bullet cameras.

Custom (home made) power distribution and video/audio support box.
Back to top

